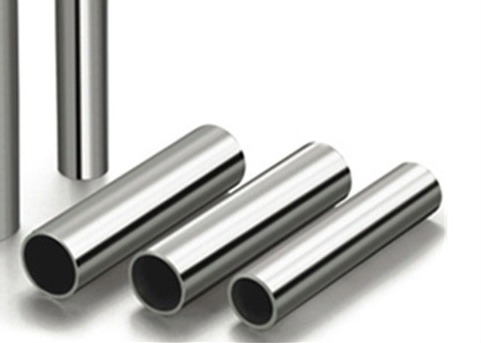
STM A249 A269 A270 304 304L 316 316L Stainless Steel Tube Pipe For Food / Milk Processing Industry
Specification Scope :
This specification applies to general tube and food / milk processing industry (FQ).
Equivalent standards :
AS1528.1 - Tubes for the food Industry
ASTM A249 & A269 - Boiler, heat exchanger and condenser tubes
ASTM A270 - Seamless and Welded Austenitic and Ferritic/Austenitic Stainless Steel Sanitary Tubing
ASTM A554 - General & Architectural Application
JIS G3447 - Stainless steel sanitary pipes
JIS G3463 - Stainless steel boiler and heat exchanger tubes.
Available sizes :
Tube sizes range from 6.35 mm to 203.2 mm outside diameter.
Grades of Material :
304, 304L,316, 316L Stainless Steel
Manufacture :
Automatic tig welding with no addition of filler metal
Heat treatment :
Tube is not post weld heat treated except for Standards ASTM A269 & A249 where tube is annealed
Material Tests
| Grades |
TP 304 |
TP 304L |
TP 316 |
TP 316L |
| C max |
0.07 |
0.03 |
0.08 |
0.03 |
| Mn max |
2.00 |
2.00 |
2.00 |
2.00 |
| P max |
0.045 |
0.045 |
0.045 |
0.045 |
| S max |
0.03 |
0.03 |
0.03 |
0.03 |
| Si max |
0.75 |
0.75 |
0.75 |
0.75 |
| Cr |
17.5 -- 19.5 |
17.5 -- 19.5 |
16 -- 18 |
16 -- 18 |
| Ni |
8 -- 10.5 |
8 -- 12 |
10 -- 14 |
10 -- 14 |
| N max |
0.10 |
0.10 |
0.10 |
0.10 |
| Mo |
-- |
-- |
2.00-3.00 |
2.00-3.00 |
Mechanical Tests
Except tube made to ASTM A249 and specifically requested otherwise Yield stress , Tensile tests & Hardness Mn - Manganese tests are from coil manufactured to ASTM A240 / 480.
Yield Stress (Coil)
| TP 304 & TP 316 |
205 MPa min |
| TP 316L & TP304L |
170 MPa min |
Tensile Stress (Coil)
| TP 304 & TP 316 |
515 MPa min |
| TP 316L & TP 304L |
485 MPa min |
Elongation (Coil)
40% Minimum (50mm test piece)
Hardness tests (Coil)
| TP 304 & TP 304L |
92 HRB / 202 HB30 max |
| TP 316 & TP 316L |
95 HRB / 217 HB30 max |
Tube Weld Integrity Tests
Reverse Bend Test :
Flatten to 2 times material thickness.
Flare / Cone Test :
Minimum 1.21 tube diameter (60 deg included angle).
Flange Test :
Minimum 1.10-1.15 tube diameter.
Eddy Current Test :
All tube diameters are on-line eddy-current tested.
Tube Dimensional Tolerances
Outside diameter (OD)
| O/D ≤ 31.8 µm |
± 0.13 µm |
| 31.8 < O/D ≤ 76.2 µm |
± 0.25 µm |
| 101.6 < O/D ≤ 127.0µm |
± 0.38 µm |
| 152.4 < O/D ≤ 203.2µm |
± 0.76 µm |
Ovality :
Difference between maximum and minimum diameters at any one cross section to be within max & min sizes as above.
Thickness tolerance :
to ±0.10mm (AS 1528:1)
Weld Bead :
Weld bead of tube without cold work controlled to 110% of wall thickness
Straightness :
Maximum of 1.0 mm / metre
Length tolerance :
Standard length 6 metres -0 /+35 mm Cut to exact length jobs, by agreement (+/- 1 mm)
Finish End finish :
Sizes to 203.2 deburred both ends
Finish internal :
Tubes with diameter greater than or equal to 31.8 mm are internally cold worked (Internal weld beaded to tube surface). Tubes with diameter less than 31.8 mm are in as welded condition and internal weld height is controlled to a minimum height.
Finish external :
Available as follows:
As welded condition (external weld bead removed).
May have forming, straightening & weld polish cross hatch marking.
Standard Polished equivalent to 320 Grit - typical Ra = 0.5µm to 0.8 µm
Minor form marks may be visible. .
Documentation & Packaging
Packaging :
Polished Tube is individually plastic sleeved in a bundle with steel strapped cleats and plywood for forklift plate.
Traceability :
Controlled batch traceability from raw material to finished tube. For traceability purpose the tube is either inkjet marked or attached with label identifying sizes , batch & trace numbers.
Test certificate :
Raw material test certificates are available on request. Certificate of Test of Finished Tube is provided for the tube dispatched under ASTM A249/ A269.

 Your message must be between 20-3,000 characters!
 Please check your E-mail!
  Your message must be between 20-3,000 characters!
 Please check your E-mail!
